
SubCaptioner automatically creates captions and transcriptions for your media and video files using ASR (automated speech recognition) technology. To make edits to your automatically created caption files, use our new editor! The SubCaptioner editor is designed to allow users to quickly and easily make corrections to their files without the use of a third-party editor.
How to use (step-by-step)
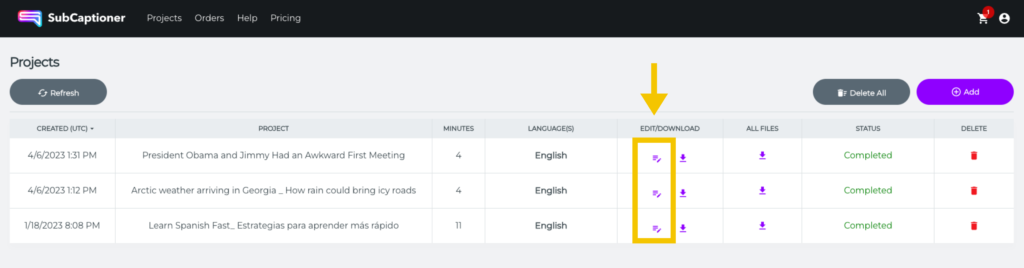
To begin making corrections to your files using the SubCaptioner editor, start on the projects page and click on the edit icon under the “EDIT/DOWNLOAD” column.
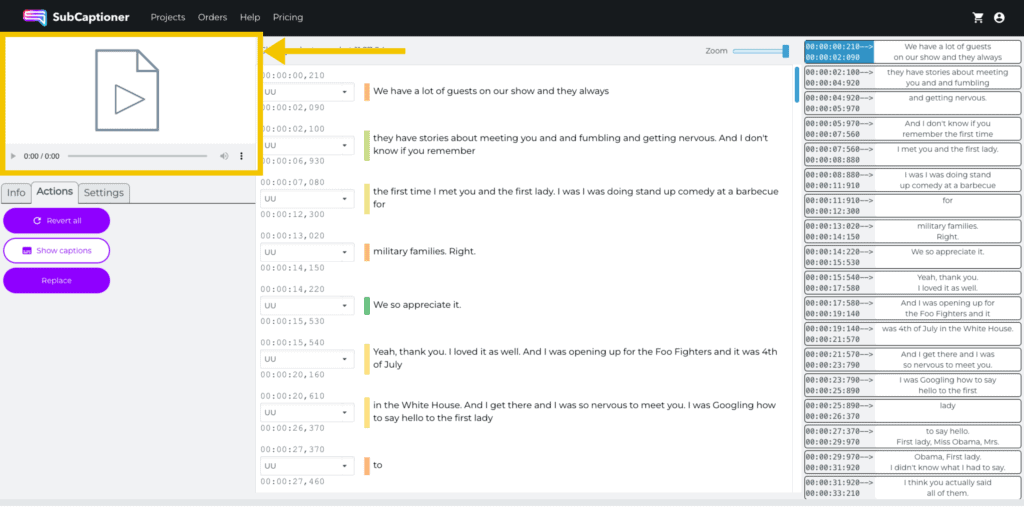
Once you have opened the editor, you’ll notice there are three main columns. The first column is where you can upload your audio or video file and make bulk edits to the settings of your captions. The second column is where you can edit the text and speaker names, and the third column shows how the captions will be separated and appear on the screen.
Start by uploading your audio or video file.
Underneath the upload box, you can change the settings of your captions and also revert all changes to the original file. Use the replace button to make bulk edits to a word, such as a misspelling of a name or place.
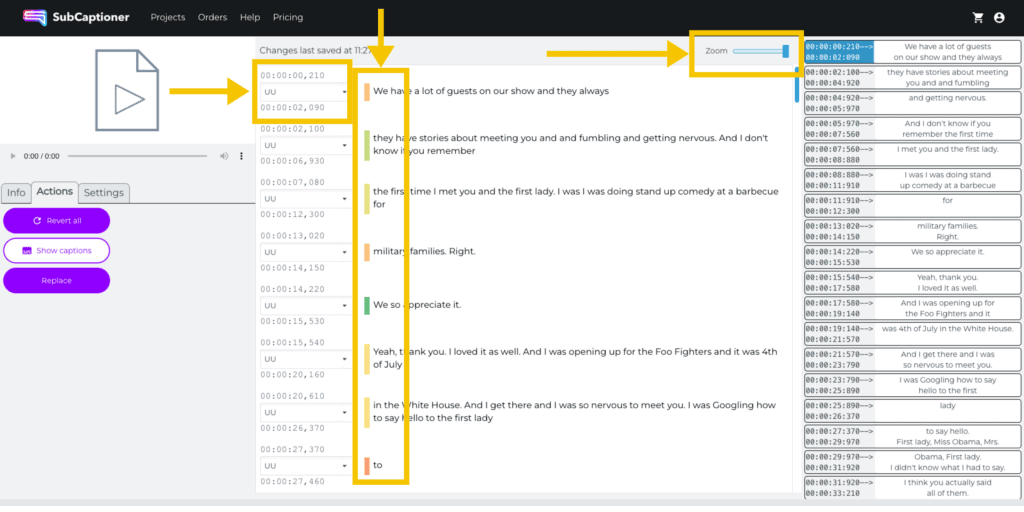
Move the Zoom slider in the middle column according to how you want to see and edit the text. The colored lines next to each line of text show where any possible errors may have occurred. Green represents text that contains no detected errors while yellow represents lines where minor errors may have occurred. Darker orange/red colored lines show where the ASR technology had more difficulty in detecting the speech. Make edits to the text directly in the middle column.
Make edits to the speaker name by using the dropdown next to each line of text to assign the speaker number.
The right-hand column shows how captions will appear on the screen. To see how these captions align with the timing of your audio or video file, press play in the upper left corner and watch as the blue box next to each caption moves as the file plays.
Your edits are saved automatically! Once you’re finished editing, your changes will be saved automatically. Simply go back to the projects page to download your edited file.
Tips & Tricks
- To quickly replace a commonly misspelled word (such as a name or location), use the “replace” button under “actions” in the left-hand column. This will replace all instances of an incorrect spelling with the word that you choose. For example, replace all instances of the spelling “Zoey” with “Zoe”.
- Start editing the lines of text that are marked with a darker shade of orange/red first, then check the lines marked with a light yellow color. This will help you to make the most important edits quickly and improve the accuracy of your files more easily.
- Deleting a whole line of text will delete that caption box while pressing “enter” and adding a line of text will add a new caption box. Be careful when deleting or adding caption boxes as this may affect the timing of each caption. Check the timing by playing your audio or video file and following along with the captions in the right-hand column.
Frequently asked questions
For more information about how to use SubCaptioner’s caption editor, check out these frequently asked questions or contact our team.
How can I correct my own mistakes?
Normal undo functions, such as Ctrl+Z, should reverse small changes. For larger changes, use the REVERT button to revert the file to its original, unedited form.
How is the text divided into blocks in the Editor?
The size of the text blocks displayed in the editor is determined by a change of speaker or a pause in the speech. The Display Gap setting adjusts the duration of the pause required for a new block. A longer gap (to the right of the slider) results in fewer blocks, and a shorter gap displays more blocks. The size of the block itself has no effect on the final captions.
Can I play my media synchronized to the ASR text?
Click on the Choose Media File button and select your media file from your local file system (for security your media file is not kept on the SubCaptioner cloud storage after ASR processing). The text display should scroll automatically with media playback and vice-versa. Right-click on the video window to display additional controls – including a larger floating video window (picture-in-picture).
For demo projects, the media is already stored and ready to play.
How can I adjust the splits between captions and between rows within captions?
Several factors affect the segmentation of the text into captions; these include some grammar-based rules (currently only for English) as well as timing, punctuation, and caption size. Behavior can be adjusted through the Settings panel. For instance, a pause in speech greater than the Maximum Inter Word Gap results in a caption break. Adding punctuation to the transcript text can also change a caption break – as displayed in the Show Captions panel. Splitting a block (by pressing Return) also forces a caption break.
How can I split one block into two smaller blocks?
Position the cursor at the desired break then press Return. The timing of the new blocks follows the timing of the words in each block.
How can I add a block for missing text?
Position the cursor at the end of a block then press Return to add a new empty block following the current block. The timing of the new block fills the gap between the previous block and the next one. The timing of any text added to this block will be averaged across the duration of the block when segmented into captions.
How can I delete a block?
First, delete any text in the block and then press Delete.
How can I correct the speaker assignment?
Click on the drop-down beside the speaker ID to select one of the alternative speakers.
How can I correct the speaker assignment for part of a block?
First, break the block into two blocks (position the cursor at the desired break then press Return), and then use the drop-down beside the speaker ID to select the correct speaker for each block.
How can I change the speaker names or add a new speaker to the list?
This is a new feature that will be coming soon!